Cheer Bow Instructions
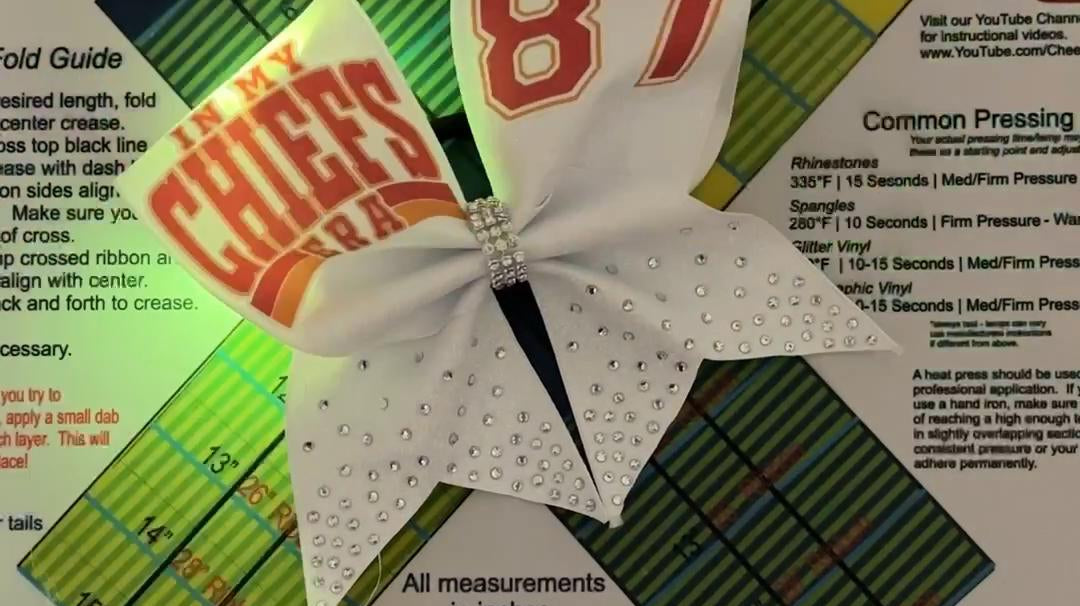
HOW TO MAKE A CHEER BOW STEP BY STEP
Supplies Needed:
30 inches of 3 inch grosgrain ribbon
4 inches of 3/8 inch Glitter Velvet Ribbon
Elastic Pony Tail Holder
Hot Glue Gun
Scissors
Wood Burner
Cheer Bow Template Mat
Double Sided Disks
Zip Tie
Stiffening Spray
Iron
Step 1:
Cut your ribbon to 30 inches long. You can adjust this length to add longer tails or bigger loops. Usually, you will not need more than 32 inches of ribbon. Fold your ribbon in half to leave a visible crease as the center or make a small mark.


Want to add some extras? See our YouTube Channel
Service Terms
Unless otherwise specified, all materials appearing on this site; including text, site design, logos, graphics, icons, and images, as well as the selection, assembly and arrangement thereof, are the sole property of Cheer Bow Supply., Copyright ©, ALL RIGHTS RESERVED. You may use the content of this site only for the purpose of shopping in this store or placing an order and for no other purpose. No materials from this site may be copied, reproduced, modified, republished, uploaded, posted, transmitted or distributed in any form or by any means without our prior written permission. All rights not expressly granted herein are reserved. Any unauthorized use of the materials appearing on this site may violate copyright, trademark and other applicable laws and could result in criminal or civil penalties.
CREDIT CARDS
We accept credit cards as a form of payment. There is no surcharge for using your credit card to make purchases. Please be sure to provide your exact billing address and telephone number (i.e. the address and phone number your credit card bank has on file for you). Incorrect information will cause a delay in processing your order.
LINKS
This site may contain links to other sites on the Internet that are owned and operated by third parties. You acknowledge that Cheer Bow Supply is not responsible for the operation of, or content located on or throughout any such site.
MULTIPLE PRODUCT ORDERS
For multiple product orders, we will make every attempt to ship all items contained in that order at the same time. Products that are unavailable at the time of shipping will be shipped as they become available, unless you inform us otherwise. You will only be charged for products contained in a given shipment, plus any applicable shipping charges. You will only be charged for shipping at the rate quoted to you on your purchase receipt. The entirety of this shipping charge will be applied to the first product(s) shipped on a multiple shipment order.
ORDER ACCEPTANCE POLICY
Your receipt of an electronic or other form of order confirmation does not signify our acceptance of your order, nor does it constitute confirmation of our offer to sell. Cheer Bow Supply reserves the right at any time after receipt of your order to accept or decline your order for any reason or to supply less than the quantity you ordered of any item.
OTHER CONDITIONS
These conditions will supersede any terms and/or conditions you include with any purchase order, regardless of whether this store signs them or not. Cheer Bow Supply reserves the right to make changes to this site and these conditions at any time.
OUT-OF-STOCK PRODUCTS
We will ship your product as it becomes available. Usually, products ship by the next business day. However, there may be times when the product you have ordered is out-of-stock, which will delay fulfilling your order. We will keep you informed of any products that you have ordered that are out-of-stock and unavailable for immediate shipment. You may cancel your order at any time prior to shipping.
PRIVACY
We keep your personal information private and secure. When you make a purchase from Cheer Bow Supply, you provide your name, email address, credit card information, address, phone number and a password. We use this information to process your order(s), to keep you updated on your purchases and to personalize your shopping experience.
Our secure servers protect your information using advanced encryption techniques and firewall technology.
To keep you informed about our latest offers, we may notify you of current promotions, specials and new additions to this store. You may unsubscribe from our newsletters by following the unsubscribe instructions in any email you receive from us.
We use "cookies" to keep track of your current shopping session to personalize your experience and so that you may retrieve your shopping cart at any time.
PRIVACY ON OTHER WEB SITES
Other sites accessible through our site have their own privacy policies and data collection practices. Please consult each site's privacy policy for more information. Cheer Bow Supply is not responsible for the actions of third parties.
RETURNS
We will gladly accept the return of products that are defective due to defects in manufacturing and/or workmanship. Fulfillment mistakes that may be made which result in the shipment of incorrect products to you will also be accepted for return.
TAXES
Our store will automatically charge and withhold the applicable sales tax for orders to be delivered to addresses within the same state/province where Cheer Bow Supply holds a presence. For orders shipped to other areas, you (the shopper) are solely responsible for any sales taxes and/or other taxes that may apply.
TYPOGRAPHICAL ERRORS
In the event a product is listed at an incorrect price due to typographical error or error in pricing information received from our suppliers, Cheer Bow Supply shall have the right to refuse or cancel any orders placed for products listed at the incorrect price. Cheer Bow Supply shall also have the right to refuse or cancel any such orders whether or not the order has been confirmed and your credit card charged. If your credit card has already been charged for the purchase and your order is canceled, Cheer Bow Supply will issue a refund to your card in the amount of the incorrect price.
Product Returns
*ALL Vinyl, Fabric, Rhinestone, Spangle, Sublimation and custom/special order products are NOT returnable. Due to the nature of our template mats, they are also a non-return able product. Even though we cannot accept returns of made to order/non-returnable items, if you are having a problem with one of our products, please let us know. We may be able to help you out or offer some suggestions.
If you received an incorrect item that is not on your packing slip or are missing an item from your order please contact us immediately. This situation is handled differently than our normal return policy. We will send out the correct or missing item right away and instruct you on how to return items sent in error.
Please email us at cheerbowsupply@gmail.com with your order number, items you wish to return and a brief reason. We will email you back shortly after with specific return instructions.
Returns Terms and Conditions:
- The returned items must be in their original condition and packaging.
- Shipping costs are not refundable. If our original shipping costs exceeded the original shipping amount you paid to us, this will be subtracted from your refund.
- For example, orders that qualify for free shipping will have our shipping costs subtracted from your refund.
- Credit for returned items will be refunded to the original form of payment or store credit.
- We do not process exchanges.
- You are responsible for all return shipping costs.
- You cannot return part of a pack of multiple items. For example, if you purchased a pack of 50 headbands you cannot return 10 of them that you did not use.
- Please make sure you use a reliable, trackable shipping method and insure your return if necessary. We cannot be responsible for lost returns.
- Wholesale cases and bags that are returned will be subject to a 15% restocking fee. All other returns may be charged a 10% restocking fee.
- Special order items that are not regular stock of Cheer Bow Supply are not returnable.
- Vinyl, Fabric, Rhinestone, Sublimation, Custom, Template Mats and Spangle products are made to order and NOT returnable.
Once a return is received, we usually process it within 72 hours. If you requested store credit you will receive an email with the information to use your store credit. Refunds are issued when we process your return. Depending on your credit card, it can take 7-10 days before you see the refund on your statement. Returning an item does not guarantee that you will be issued credit. Your return will inspected upon receipt and if it does not meet our policy regarding returns it will not be processed. It can be returned to you at your expense or will be discarded.
The return address is:
Cheer Bow Supply
850 E. Lime St # 1623
Tarpon Springs, FL 34689
Product Application Info
We have included a starting point for application of fabric, vinyl, spangles and rhinestones. Because iron temperatures, hand pressure and ironing surfaces vary you may need to adjust your application method for your equipment. Below are starting points. Adjust as necessary.
BEFORE YOU BEGIN:
We carefully inspect all materials before leaving our warehouse, but there may be occasions when a piece of vinyl has been left unweeded, a rhinestone may be missing or shifted out of place or a spangle dot could be mis-cut. Please inspect before applying to make sure that no adjustments are needed. We have designed our strips so that if a spangle or rhinestone is out of place/missing you can easily adjust stones or spangles. The transfer tape is sticky. Just pick up a stone and press it down where you'd like on the tape (upside down). Spangles can be adjusted with tweezers or a pin.
Spangles:
- Set the heat press to 280-290 degrees Fahrenheit or medium/high if using an iron.
- Set the timer to 10 seconds.
- Adjust the upper platform so the pressure is high, but still able to lock down.
- Pre-press your ribbon to flatten out any wrinkles, then allow it to cool a little bit.
- Remove white backing sheet from spangle design (all you should have is the clear plastic and the spangle design) Place spangle design sticky side down aligned on your ribbon. There is no need for a cover sheet, but you may use a non-stick cover sheet or pillow case if you choose to.
- Lower heat-press. If you are using an iron, use a flat surface and firm pressure and press in sections (sligtly overlapping) until entire transfer is applied.
- Once finished, remove garment and lay out flat, design downward, on your work table.
- Rub the backside of the design to assist in cooling.
- Turn it over and rub design firmly with another garment or even the sleeve of this one.
- Once the design cools, peel off transfer paper in the direction that stretches the garment the least.
- Press a second time for half the original time frame. This helps to lock down the spangles.
If any spangles come off during this peel, you can cut out the transfer paper that holds the spangle dot(s) and replace it where it belongs. Your cut out does not have to be too precise as to hold just the one little dot(s), it should be of a workable size. Reheat the whole design for just 5-6 seconds. Press the dot(s) firmly. Be careful not to move any of the others spangles since they will be vulnerable to movement. Allow the ‘dot’ to cool then carefully peel off the transfer paper cut out. This second pressing will serve as the second press for the whole design.
Spangles should be applied to ribbon or smooth fabric only (such as regular mystique). They will not permanently adhere on top of any type of vinyl (no glitter or holographic at all). It will appear that the spangles are adhered, but they WILL eventually fall off if placed on top of glitter.
Rhinestones:
- Set the heat press to 335-350 degrees Fahrenheit or high/cotton/linen setting if using an iron. Traditionally it is not recommended to press rhinestones on top of glitter vinyl for shirts. However, since bows are not washed like garments are, you can apply rhinestone designs on top of the glitter vinyl successfully. Always test a small batch first. Some designs with multiple sizes will require you to use a pressing pillow and or press the back and front of the design before removing the transfer tape. You can also try to rub the design carefully as it cools. It is trial and error to see what settings work for your press and materials. There is not one single setting that works for everyone.
- Set the timer to 10 -15 seconds. Designs with SS16 or larger stones will need to be pressed on a heat press only, heavy pressure and 20-30 seconds. Please make sure all materials you are pressing are compatible with the pressing specs for proper rhinestone adhesion. Not following these instructions will result in stone loss.
- Adjust the upper platform so the pressure is high, but still able to lock down.
- Pre-press your ribbon to flatten out any wrinkles, then allow it to cool a little bit.
- Remove white backing sheet from rhinestone design (all you should have is the clear plastic and the rhinestone design) Place rhinestone design sticky side down aligned on your ribbon. There is no need for a cover sheet, but you may use a non-stick cover sheet or pillow case if you choose to.
- Lower heat-press. If you are using an iron, use a flat surface and very firm pressure and press in sections (slightly overlapping) until entire transfer is applied.
- Once finished, remove ribbon and lay out flat, design downward, on your work table.
- Once the design cools, peel off transfer paper in the direction that stretches the garment the least. Some designs may require a warm peel.
- If any rhinestones lift, place back down and press again.
If using both rhinestones AND spangles on the same ribbon, apply the spangles first and then adhere the rhinestones. If you apply the rhinestones first, the dimension of the rhinestones will not allow enough pressure for spangles to adhere, too.
Heat Transfer Vinyl (Glitter, Holographic, Flock, Standard Finish, Metallic):
Our vinyl is cut with the carrier sheet intact. This means that you can also cut it on your vinyl cutter if you choose to. Just remember to cut a mirror image.
Silhouette Settings:
Glitter Vinyl: Blade Setting 5; Speed 5; Thickness 10.
To adhere to ribbon
- Set the heat press to 330-340 degrees Fahrenheit or high/cotton/linen setting if using an iron.
- Set the timer to 10 -15 seconds.
- Adjust the upper platform so the pressure is high, but still able to lock down.
- Pre-press your ribbon to flatten out any wrinkles, then allow it to cool a little bit.
- Place design aligned on your ribbon. There is no need for a cover sheet, but you may use a non-stick cover sheet or pillow case if you choose to.
- Lower heat-press. If you are using an iron, use a flat surface and very firm pressure and press in sections (sligtly overlapping) until entire transfer is applied.
- Once finished, remove ribbon and lay out flat, design downward, on your work table.
- Remove the clear carrier sheet from the vinyl. Temperature is important -Glitter - warm peel; holographic - cold peel; Flock - cold peel; standard - warm or cold; metallic - cold peel.
Fabric Strips:
**Important - DO NOT OVERHEAT your fabric strips. This will cause the glue to deactivate and they will not adhere properly. More heat will not give you a better adhesion. It is actually just the opposite. Use a household iron only. If you need to heat multiple times (to layer or add decals, spangles, etc., try to iron them onto the fabric strips BEFORE you remove the paper to avoid ruining the glue, if possible). Or if adding something dimensional such as rhinestones, iron the fabric strip down with an extremely light initial press to "tack" the fabric strip down in place so it won't move on it's own, but is easily peeled off. Then add your rhinestones on top and do a quick final press from the back. This will help prevent overheating.
- Heat n bond is already applied to the back of your fabric strip. We lightly apply just in case you need to do a multi-layer application requiring you to heat the fabric strip multiple times. (adding spangles or rhinestones on top). If the heat n bond is separating, just lightly iron the paper side of the fabric strip. It will stick right back on.
- Peel off paper liner.
- Place material, adhesive side down, on top of your ribbon. Press & hold iron (use household iron ONLY - we do not recommend a heat press) for 4-8 seconds on each section until entire entire piece is bonded.
If you do happen to overheat and deactive your glue, don't worry. You probably have not ruined the strip. All that is needed is another layer of heat n bond on the back. Since it is already cut to size, cut a piece of heat n bond material slightly bigger than the strip. There is no need to be exact, you can use just scissors. Iron the strip onto this piece from the back (paper side). Allow to cool and peel the fabric off the heat n bond. The glue will stick to only the fabric strip and you can start over. It's okay! It happens to everyone at some point.
Ready to press sublimation sheets: YOU MUST HAVE A HEAT PRESS CAPABLE OF REACHING 400 DEGREES. A HOUSEHOLD IRON WILL NOT WORK
On glitter HTV:
- Quick-press your glitter htv onto your ribbon. This means to just press for a few seconds onto your ribbon so you can remove the clear carrier sheet and it sticks to the ribbon, but is not fully adhered. It should nto slide, but you should be able to easily peel it off the ribbon.
- Cut apart the sheet so you are working with one strip at a time. Lay the sublimation transfer to be pressed face down and tape face down onto your pressed glitter grosgrain ribbon.
- Apply a protective paper such as parchment paper onto the bottom of your press. You can use regular copy paper in a pinch if needed. Nothing waxed or printed.
- Lay your prepared glitter ribbon with transfer attached to your ribbon and press with ribbon on bottom/sublimation transfer on top and lay another sheet of protective paper on top.
- Press at 400 degrees for 50 seconds.
- Open press, carefully remove paper off ribbon.
- Repeat for other side of ribbon.
Directly on ribbon: (must be 100% polyester ribbon.
- Pre-press your ribbon.
- Cut apart the sheet so you are working with one strip at a time. Lay the sublimation transfer to be pressed face down and tape face down onto your grosgrain ribbon.
- Apply a protective paper such as parchment paper onto the bottom of your press. You can use regular copy paper in a pinch if needed. Nothing waxed or printed.
- Lay your ribbon with transfer attached to your ribbon and press with ribbon on bottom/sublimation transfer on top and lay another sheet of protective paper on top.
- Press at 400 degrees for 50 seconds.
- Open press, carefully remove paper off ribbon.
- Repeat for other side of ribbon.
Fabric: (must be 100% polyester fabric)
- Pre-cut your fabric to desired width/length. Do not apply adhesive first or you risk over heating it.
- Cut apart the sheet so you are working with one strip at a time. Lay the sublimation transfer to be pressed face down and tape face down onto your fabric strip.
- Apply a protective paper such as parchment paper onto the bottom of your press. You can use regular copy paper in a pinch if needed. Nothing waxed or printed.
- Lay your fabric with transfer attached to your ribbon and press with ribbon on bottom/sublimation transfer on top and lay another sheet of protective paper on top.
- Press at 400 degrees for 50 seconds.
- Open press, carefully remove paper off fabric.
- Affix fabric strip to ribbon using your preferred adhesive.
TIPS:
If applying multi-layers - follow this order:
1. Fabric strip or vinyl to ribbon
2. Apply spangles to fabric
3. Apply rhinestones
Sometimes, heating fabric multiple times for multi-layer applications can cause adhesion problems. Heat and bond glue tends to soak too much into fabric or burn off if it is overheated and will start to separate. If this happens, try these tips:
- apply spangle or rhinestone strips to fabric strip first before applying the fabric to the ribbon. Just leave the paper back in place and press the spangles right on top using the above instructions. Then, peel off the paper and apply the fabric with the spangles or rhinestones to the ribbon like normal. This allows multiple heatings without the glue soaking into the ribbon AND fabric at the same time. Keeping the paper intact seems to keep the glue from burning off/soaking in too much.
- when layering vinyl (especially cut out layers) do a half press to adhere the first layer and subsequent layers. You want to pressed just enough so it sticks, but not a final press. Once all layers are in place, do a final press for 5-6 seconds.
-You should avoid layering glitter vinyl. You can get away with it somewhat for cheer bows, but because of the texture, it will eventually separate. You cannot layer anything over holographic vinyl. It is too slick of a surface and anything will peel right off.
MPORTANT INFORMATION REGARDING RIBBON WIDTH AND YARDAGE: Ribbon widths may vary. This is a normal part of the manufacturing process called variance. This happens with ALL ribbon manufacturers, colors, widths, etc. We work closely with our manufacturer to minimize this, but it can happen. This can cause a 3" wide ribbon to be slightly less or slightly more than 3" wide (it actually happens with all widths, but is most noticable in wider widths). We trim and size all our fabric, vinyl, spangles and rhinestones to fit 3" ribbon ALMOST every time. Most widths are cut to 2.8" wide for vinyl, spangles and rhinestones and a full 3" for fabric. There will be times when some modification will be necessary to achieve the desired look (such as removing some rhinestones, trimming an edge of fabric, centering the fabric on your ribbon without edge to edge coverage, etc.). The only way to fully prevent this is to first measure the exact piece of ribbon you intend to use (for each bow because even in a continuous spool of ribbon, the width can vary) and then custom cut each piece for that one bow. Please rest assured that the vast majority of our products work seemlessly together and can easily be worked with.
Ribbon spools greater than 5-yards long may not be continuous. We avoid splices in the ribbon as much as possible, but it is a normal manufacturing expectation.