
Make a perfect cheer bow every time using professional tools from Cheer Bow Supply. This step-by-step cheer bow tutorial shows exactly where to fold, how to shape the bow, and where to place graphics for consistent results.

Supplies Needed to Make a Cheer Bow
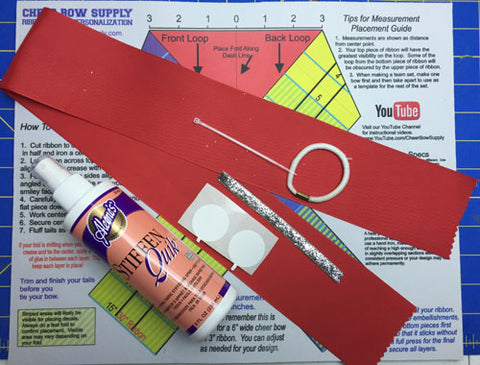
- 30 inches of 3 inch grosgrain ribbon
- 4 inches of rhinestone or glitter bow center ribbon
- Elastic ponytail holder (no metal)
- Hot glue gun and glue sticks
- Scissors
- Wood burner (to seal ribbon ends)
- Cheer bow template mat
- Double-sided adhesive disks
- Plastic zip tie
- Stiffening spray and iron (optional)
Step-by-Step Instructions
Step 1: Cut and Prepare the Ribbon

Cut 30 inches of 3 inch grosgrain ribbon. Fold the ribbon in half and lightly crease the center. This crease marks the center point of the cheer bow.
Step 2: Position the Ribbon on the Template

Lay the ribbon flat on the cheer bow template mat with the crease centered. If using a ruler, place the crease at the 3-inch mark to keep measurements even.
Step 3: Fold the Ribbon into Bow Shape

Fold both ribbon tails downward following the guide on the mat. Cross the ribbon in the center so the top of the cross sits just under the back ribbon.


Step 4: Secure the Center Shape

Place a double-sided adhesive disk at the center to help hold the shape. Line up the top of the crossed ribbon with the top of the back ribbon.
Step 5: Create Volume

Pinch the center back and forth to create accordion-style folds. This gives the cheer bow fullness and volume.
Step 6: Add the Zip Tie

Wrap a zip tie around the center and tighten halfway. Check that loops and tails are even before tightening fully.
Step 7: Tighten and Trim

Align the zip tie closure at the back of the bow. Pull tightly and trim off excess zip tie.
Step 8: Attach the Ponytail Holder


Hot glue the elastic ponytail holder securely to the back of the cheer bow.
Step 9: Add the Bow Center


Glue the 4-inch center ribbon to the middle of the bow. Wrap around tightly and secure on the back.
Step 10: Trim and Seal the Tails

Fold ribbon tails in half and cut at an angle. Seal the ends lightly with a wood burner to prevent fraying.
Want to Add Extra Sparkle?
Visit our Cheer Bow Supply YouTube Channel for advanced techniques, rhinestones, vinyl, and graphic placement tips.